Unleash the magic of React Native Maps with Expo as we guide you through integrating Google Maps and markers. Elevate your app’s user experience and functionality with interactive maps, markers, and more. Let’s dive in and create an unforgettable journey for your users!
Table of content
- Importance of maps in mobile applications
- Overview of integrating Google Maps and markers in React Native using Expo
- Creating a new Expo project and install required dependencies
- Installing the react-native-maps library
- Adding a map component to your app
- Creating marker
- Setting marker coordinates
- Recap of the steps to add Google Maps and markers in React Native with Expo
1.Introduction
Welcome to my exciting blog tutorial on React native maps integration with markers using Expo! Maps have become an indispensable feature in mobile applications, enabling users to explore, navigate, and interact with their surroundings. In this article, I will walk you through the steps to effortlessly integrate Google Maps and markers into your React Native app, leveraging the power and simplicity of Expo. Get ready to enhance your app with interactive maps that captivate your users and provide valuable location-based functionality. Let’s dive in and unleash the potential of maps in React Native!
2.Setting Up Your React Native Maps Project with Expo
First we need to create a new React native expo project for our app. To do that we can simply run below command on your Terminal/CMD.
npx create-expo-app map-test
If you need more details about the expo. You can read the documentation from here https://docs.expo.dev/
You can give any name to your app. I have named it ‘map-test’. After the installation you will have a fresh react native expo app. You can run this app on your physical device or your emulator. I’m using an IOS emulator for testing. To run the app run below command.
expo start3. Integrating React Native Maps with Expo
There are several map libraries that we can use with the expo framework. In this tutorial I’m going to use the ‘react-native-maps’ library. Here is the official documentation if you need to know anything more :- https://docs.expo.dev/versions/latest/sdk/map-view/
npx expo install react-native-maps
After the installation successfully finishes, we can start our development. Lets display map in the app.
First we need to import the map library to our project. I’m going to use the app.js file to implement the map.
import MapView , { Marker } from 'react-native-maps';
Also import other dependencies into your project like below.
import React, {useState} from 'react';
import { StyleSheet, View, Text } from 'react-native';
Also we need to have a location to config the map. It can be done in several ways. I’m going to do this using the useState hook. I picked a random location inside Sri Lanka and then added it like below.
const [mapLat, setMapLat] = useState(6.841776681);
const [mapLong, setMapLong] = useState(79.869319);
Then inside the return function we can add our map component.
<View style={styles.container}>
      <MapView
        style={styles.map}
        initialRegion={{
          latitude: mapLat,
          longitude: mapLong,
          latitudeDelta: 0.0922,
          longitudeDelta: 0.0421,
        }}
      >
      </MapView>
</View>
Also need to add some stylings to display the map. Otherwise you may not see the map.
const styles = StyleSheet.create({
  container: {
    flex: 1,
  },
  map: {
    width: '100%',
    height: '100%',
  },
});
Now you can run the app. Then you will see the below result.

Full App.js
import React, {useState} from 'react';
import MapView , {  Marker,Heatmap  } from 'react-native-maps';
import { StyleSheet, View, Text } from 'react-native';

export default function App() {

  const [mapLat, setMapLat] = useState(6.841776681);
  const [mapLong, setMapLong] = useState(79.869319);

  return (
   <View style={styles.container}>
      <MapView
        style={styles.map}
        initialRegion={{
          latitude: mapLat,
          longitude: mapLong,
          latitudeDelta: 0.0922,
          longitudeDelta: 0.0421,
        }}
      >
      </MapView>
    </View>
  );
}

const styles = StyleSheet.create({
  container: {
    flex: 1,
  },
  map: {
    width: '100%',
    height: '100%',
  },
});
4. Adding Markers to the React Native Maps
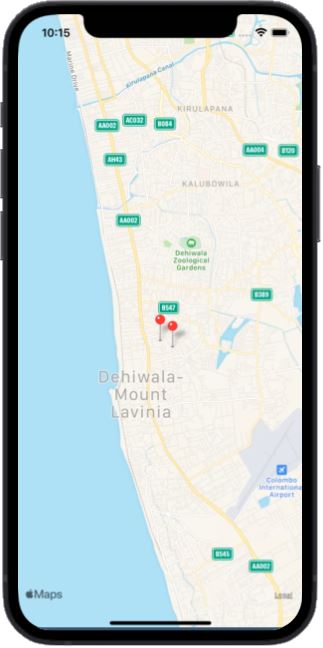
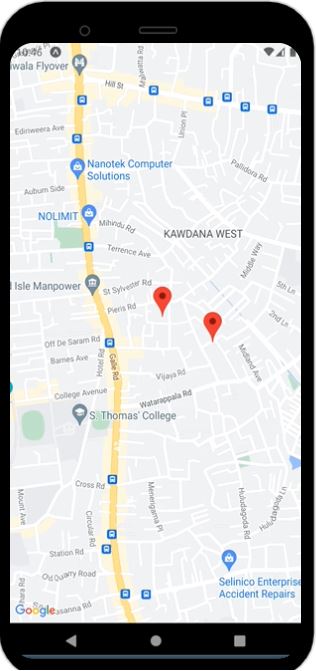
It’s time to add some markers into our react native maps app. First we need to create this marker location. That also can be done in several ways. It’s actually dependent on your requirement. I just store this location data as a local json object. But you can get the location from a database, API or whatever. I will show you other methods in my next blog.
 const locationData = [
    {latitude: 6.841776681, longitude: 79.869319},
    {latitude: 6.84076664, longitude: 79.871323},
  ];
I added 2 random locations into a json object in Sri Lanka like above. After that we need to display this list of locations.
{locationData.map((data, index) => (
          <Marker
            key={index}
            coordinate={{
              latitude: data.latitude,
              longitude: data.longitude,
            }}
            title={`Marker ${index + 1}`}
            description={`Weight: ${data.weight}`}
          />
))}
Full App.js
import React, {useState} from 'react';
import MapView , {  Marker,Heatmap  } from 'react-native-maps';
import { StyleSheet, View, Text } from 'react-native';

export default function App() {

  const [mapLat, setMapLat] = useState(6.841776681);
  const [mapLong, setMapLong] = useState(79.869319);

  const locationData = [
    {latitude: 6.841776681, longitude: 79.869319},
    {latitude: 6.84076664, longitude: 79.871323},
  ];

  return (
   <View style={styles.container}>
      <MapView
        style={styles.map}
        initialRegion={{
          latitude: mapLat,
          longitude: mapLong,
          latitudeDelta: 0.0922,
          longitudeDelta: 0.0421,
        }}
      >
      {locationData.map((data, index) => (
          <Marker
            key={index}
            coordinate={{
              latitude: data.latitude,
              longitude: data.longitude,
            }}
            title={`Marker ${index + 1}`}
            description={`Weight: ${data.weight}`}
          />
        ))}
      </MapView>
    </View>
  );
}

const styles = StyleSheet.create({
  container: {
    flex: 1,
  },
  map: {
    width: '100%',
    height: '100%',
  },
});
Its time to run our React Native Maps app.
expo start
IOS Output
Android Output
5. Conclusion For Our React Native Maps App
In conclusion, integrating Google Maps and markers into your React Native maps app using Expo opens up a world of possibilities. By following the steps outlined in this tutorial, you can enhance your app with interactive maps, markers, user location tracking, and custom overlays. The seamless integration of maps not only improves the user experience but also provides valuable location-based functionality. So, go ahead and incorporate React Native Maps into your app, and watch it come alive with the power of maps. Get ready to navigate, explore, and engage with your surroundings like never before!