Today we are going to implement google maps directions service into our react native expo app. By combining the capabilities of React Native Expo and the Google Maps API, we can create custom route directions between two points in our mobile applications. We’ll guide you through the setup process, provide step-by-step instructions for implementation, and offer tips to enhance the visual appeal of the directions. Whether you’re a beginner or an experienced developer.. Let’s start on this mapping journey with Google Maps directions at the helm!.
Table of content
- Overview
- Discussing the necessary dependencies and libraries for Google Maps integration in React Native Expo
- Step-by-step instructions for creating a new React Native Expo project
- Installing and configuring the necessary dependencies for Google Maps integration
- Setting up the Google Maps API key for authentication and usage
- Displaying the map on the screen and setting initial coordinates
- Parsing the route data to extract necessary information for drawing the directions
- Adding visual cues such as markers, polylines, or arrows to indicate the route
- Recap of the process for creating custom route directions on React Native Expo Google Maps
1.Introduction to Google maps directions
React Native Expo is a powerful framework that enables developers to create cross-platform mobile applications easily. With its rich set of pre-built components and simplified development process, React Native Expo has gained popularity among developers worldwide.
One key feature that can greatly enhance the functionality and user experience of mobile apps is the integration of Google Maps directions. Google Maps directions provide powerful mapping and navigation capabilities, allowing users to explore and navigate the world around them with ease and precision.
In this article, we will focus on a specific aspect of Google Maps integration in React Native Expo: drawing custom route directions between two points. Being able to display clear and interactive route directions can greatly improve the usability of mobile applications, especially those that involve navigation, delivery services, or transportation.
Throughout this article, we will guide you step-by-step on how to implement this feature in your React Native Expo project using Google Maps directions. We will cover the necessary setup, demonstrate the usage of Google Maps APIs for retrieving and displaying route directions, and explore techniques to customize and enhance the visual representation of the directions.
Whether you’re a beginner looking to enhance your React Native Expo skills or an experienced developer seeking to integrate Google Maps directions into your app, this article is here to help. So, let’s dive in and learn how to create stunning and interactive route directions in React Native Expo using the power of Google Maps directions.
2. Understanding the Requirements
Actually there are tons of free libraries on the internet that we can use to display maps inside our react native expo app. But I selected a very good and rich library called ‘react-native-maps’ to display maps and markers.
Note :- If you have no idea about how to add react native maps and display marker on react native expo app here is a article that I published before
https://udarax.me/react-native/react-native-maps/
Then you need to have another library called ‘react-native-maps-directions’. This library is for the directions services. Now we are ready to start creating our application. Here is the documentation https://github.com/bramus/react-native-maps-directions
3. Setting Up the Project for google maps directions
First we need to create a new React native expo project for our app. To do that we can simply run below command on your Terminal/CMD.
npx create-expo-app google-maps-directions
If you need more details about the expo. You can read the documentation from here https://docs.expo.dev/
You can give any name to your app. I have named it ‘google maps directions’. After the installation you will have a fresh react native expo app. You can run this app on your physical device or your emulator. I’m using an IOS emulator for testing. To run the app run below command.
expo start
There are several map libraries that we can use with the expo framework. In this tutorial I’m going to use the ‘react-native-maps’ library. Here is the official documentation if you need to know anything more :- https://docs.expo.dev/versions/latest/sdk/map-view/
npx expo install react-native-maps
Also you need to run the below command to install directions service into our app. Here is the documentation of this library :- https://github.com/bramus/react-native-maps-directions
npm install react-native-maps-directions
Now we need to have a google map api key. I have published an article on how to get a google map api key for free. You can read it from here and come back with the api key. https://udarax.me/technology/get-google-maps-api-key/
4. Implementing Google Maps in React Native Expo
After the installation successfully finishes, we can start our development. Lets display map in the app.First we need to import the map library to our project. I’m going to use the app.js file to implement the map.
import MapView , { Marker } from 'react-native-maps';
Also import other dependencies into your project like below.
import React, {useState} from 'react';
import { StyleSheet, View, Text } from 'react-native';
Then you can display a map like below.
Full App.js
import React, { useState } from 'react'
import { StyleSheet, View, Button } from 'react-native';
import MapView, { Marker } from 'react-native-maps';
const App = () => {


  return (
    <View style={styles.container}>
      <MapView style={styles.map}
      initialRegion={{
        latitude: 7.8731,
        longitude: 80.7718,
        latitudeDelta: 5,
        longitudeDelta: 1,
      }}
      >
      </MapView>
    </View>
  );
};
const styles = StyleSheet.create({
  container: {
    flex: 1,
  },
  map: {
    flex: 1,
  },
});
export default App;
Its time to run our React Native Maps app.
expo start
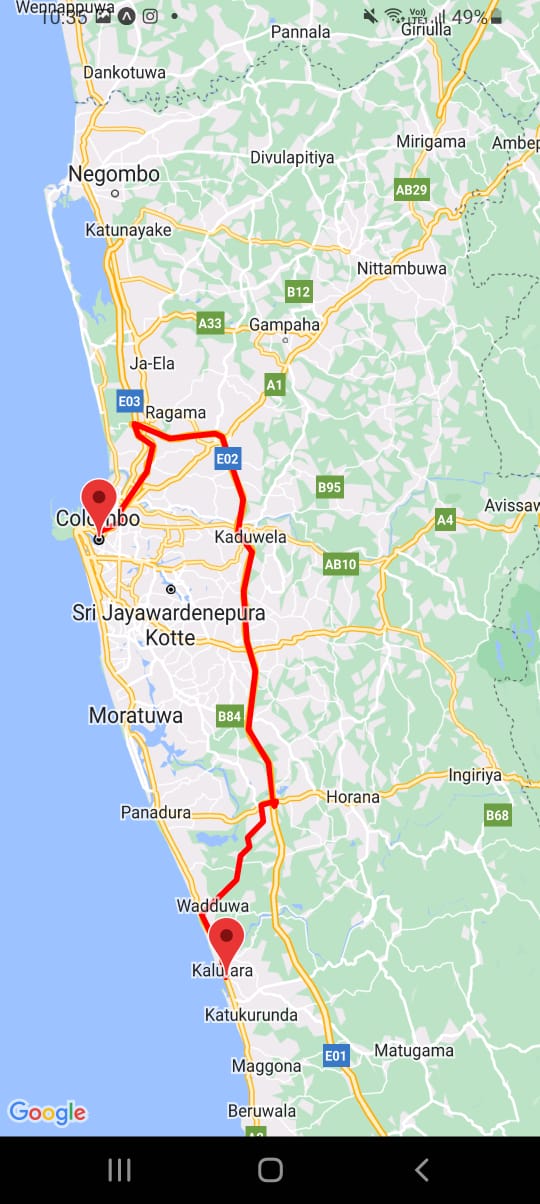
5. Drawing Directions between Two Points with google maps directions
First we need to import the direction library to our project. I’m going to use the app.js file to implement the map.
import MapViewDirections from 'react-native-maps-directions';
Now we need to have 2 points to display directions ( routes ). So I create 2 states to store the data of these 2 points. Make sure you have imported the useState hook like below.
import React, { useState } from 'react';
Inside the App function,
const [destination, setDestination] = useState({
    latitude: 6.5792,
    longitude: 79.9629,
});

const [origin, setOrigin] = useState({
  latitude: 6.9271,
  longitude: 79.8612,
});
You are ready to display the directions ( Routes ) now.
<MapView style={styles.map}
      initialRegion={{
        latitude: 7.8731,
        longitude: 80.7718,
        latitudeDelta: 5,
        longitudeDelta: 1,
      }}
>
        <MapViewDirections
          origin={origin}
          destination={destination}
          apikey="YOUR_GOOGLE_MAPS_API_KEY_HERE"
          strokeWidth={4}
          strokeColor="red"
        />
</MapView>
You also can add markers to start and end points like below.
<Marker
  coordinate={origin}
  title="Starting Point"
/>
<Marker
  coordinate={destination}
  title="Destination Point"
/>
Also you can change it to any mode using mode attribute: Which transportation mode to use when calculating directions. Allowed values are “DRIVING”, “BICYCLING”, “WALKING”, and “TRANSIT”
Example :- mode={'WALKING'}
There are much more custom settings on the documentation. You can try it out as you wish.
Here is the full code.
import React, { useState } from 'react';
import { StyleSheet, View, Button } from 'react-native';
import MapView, { Marker } from 'react-native-maps';
import MapViewDirections from 'react-native-maps-directions';

const App = () => {

  const [destination, setDestination] = useState({
      latitude: 6.5792,
      longitude: 79.9629,
    });

  const [origin, setOrigin] = useState({
      latitude: 6.9271,
      longitude: 79.8612,
    });

  return (
    <View style={styles.container}>
      <MapView style={styles.map}
      initialRegion={{
        latitude: 7.8731,
        longitude: 80.7718,
        latitudeDelta: 5,
        longitudeDelta: 1,
      }}
      >
        <MapViewDirections
          origin={origin}
          destination={destination}
          apikey="YOUR_GOOGLE_MAPS_API_KEY_HERE"
          strokeWidth={4}
          strokeColor="red"
          mode={'TRANSIT'}
        />
       <Marker
          coordinate={origin}
          title="Starting Point"
        />
        <Marker
          coordinate={destination}
          title="Destination Point"
        />
      </MapView>
    </View>
  );
};

const styles = StyleSheet.create({
  container: {
    flex: 1,
  },
  map: {
    flex: 1,
  },
});

export default App;
6. Conclusion
In conclusion, integrating Google Maps directions into your React Native Expo projects can greatly enhance the navigation experience for users. By leveraging the power of Google Maps directions, you can provide accurate and interactive route guidance between two points within your mobile application. This article has provided a comprehensive guide on how to implement custom route directions using React Native Expo and the Google Maps API. By following the step-by-step instructions and utilizing the customization options available, you can create a seamless and visually appealing navigation experience for your app users. Embrace the capabilities of Google Maps directions in React Native Expo and take your app’s navigation to the next level.