
Learn how to easily implement Firebase Auth ( Authentication ) in your React app. This step-by-step guide covers setting up Firebase, creating login and signup components with google and email/password. Secure your app and provide personalized experiences for your users with Firebase Auth ( Authentication ).
Table of content
- Brief overview of the importance of authentication in web development
- Introduction to Firebase Authentication and its features
- Creating a Firebase project
- Enabling authentication methods (email/password, Google, Facebook, etc.)
- Configuring Firebase in a React app
- Creating a login and signup component
- Using Firebase's authentication methods (signInWithEmailAndPassword, createUserWithEmailAndPassword, etc.) in React
- Google, Facebook Signin and Signup
- Summary of key takeaways
- Further resources for learning more about Firebase Authentication and React
1. Introduction
Auth is crucial in most applications as it allows to securely identify a user. By identifying a user, an app can save user data in the cloud and provide personalized experience across all the user’s devices. Firebase Auth offers backend services, user-friendly SDKs, and pre-built UI libraries to authenticate users to the app. It supports various authentication methods such as passwords, phone numbers, and popular federated identity providers like Google, Facebook, and Twitter, among others.
Firebase Auth seamlessly integrates with other Firebase services and uses industry standards like OAuth 2.0 and OpenID Connect, making it easy to integrate with custom backends.
These days, most apps have an authentication system in order to provide their users a personalized and distinct experience. But how do we design and implement a good authentication system? In this tutorial, we are going to use the Firebase auth system with React (for front-end).
2. Setting up Firebase Authentication
2.1 Create a Firebase Account
To begin, if you do not have a Firebase account, navigate to the Firebase website here (https://console.firebase.google.com/) and sign up for one. Once you have an account, create a new project and input the necessary details.
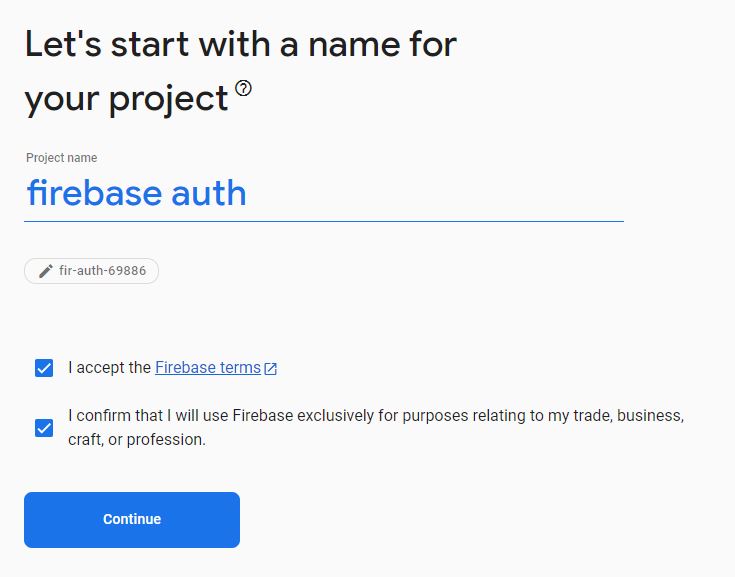
Step 1
Click ‘create a project’ button.

Step 2
Give a name for the project and then continue.
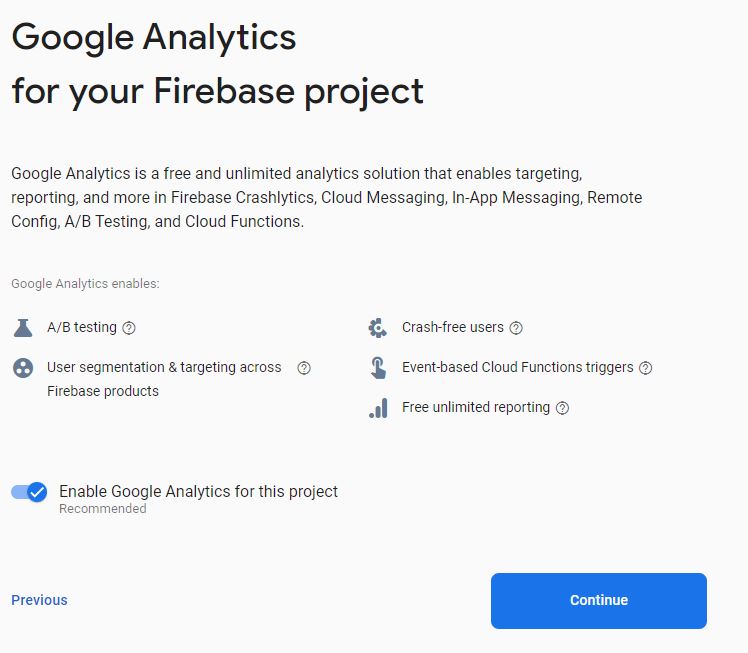
Step 3
Continue the process
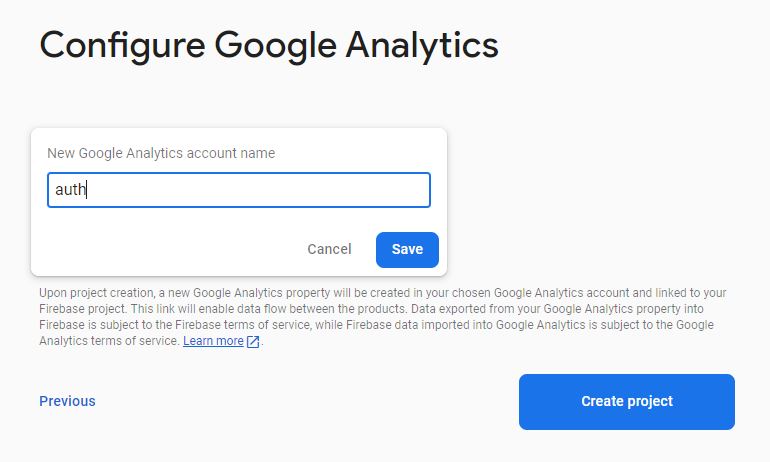
Step 4
Then create a new analytics account by giving a name from the given dropdown list and then select. In my case I used ‘auth’ as the name of google analytics account.
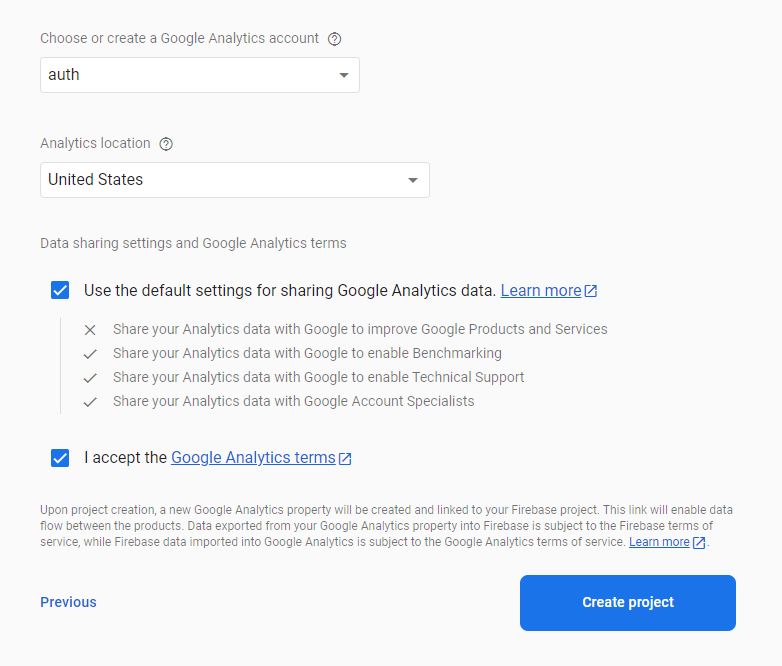
Step 5
Now select an analytics location and check the checkbox to agree their terms and conditions. Then click the ‘create project’ button.
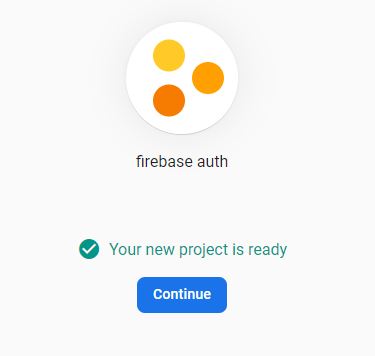
Within several seconds your project will create. Then click continue.
2.2 Enabling authentication methods (email/password, Google, Facebook, etc.)
It’s time to enable firebase auth methods for the firebase console. There are several options there.
In our case we are going to use email registration and google methods only. You can try other methods. Nothing fancy on it. Follow the same way we followed.
To enable these services,
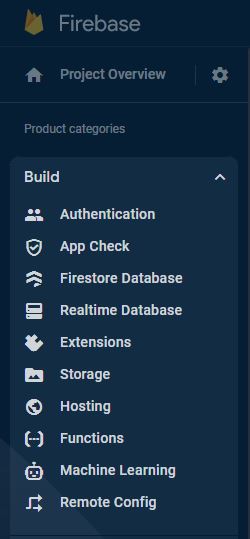
Step 1 :- First Click on the ‘build’ from the left side bar.

Then select ‘Authentication’.
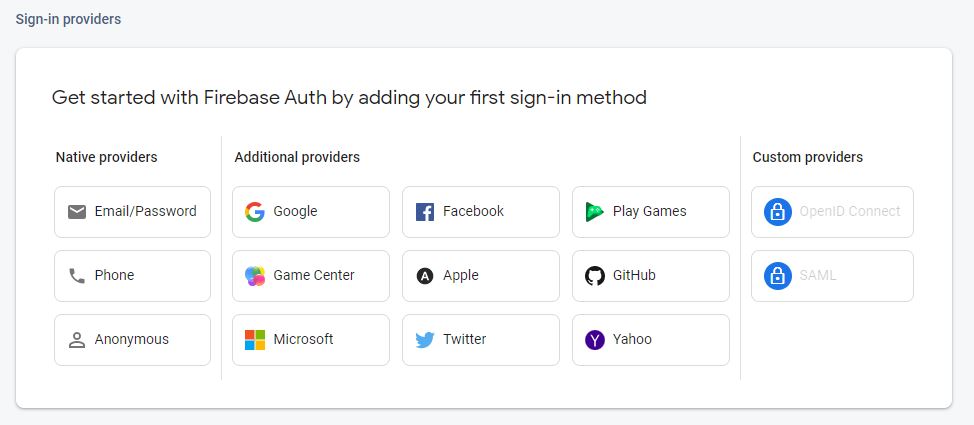
Step 2
Now you will redirect to a new page. Select ‘Get Started’ from it. Then it will popup all the firebase auth methods. You can select firebase auth methods as you need. In our case I selected only the ‘email/password’ method and ‘google’ method.
Step 3
Click on the ‘Email/Password’ method.
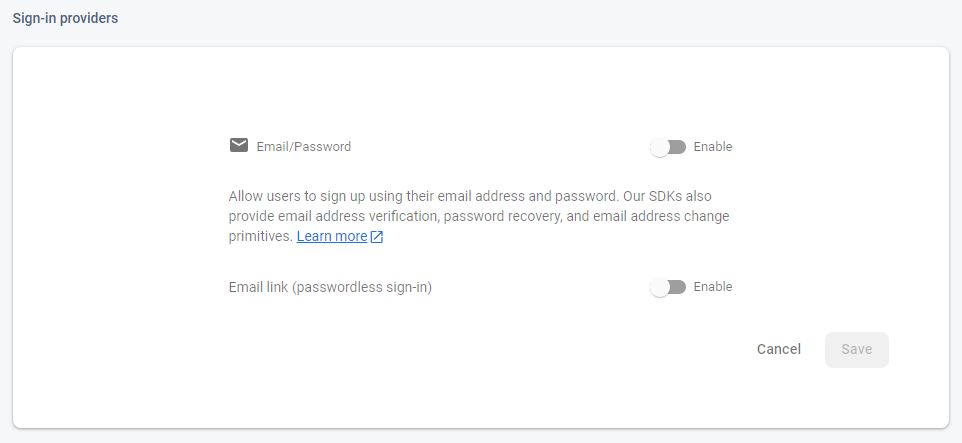
Enable all and save it. Then you will redirect to this kind of screen.
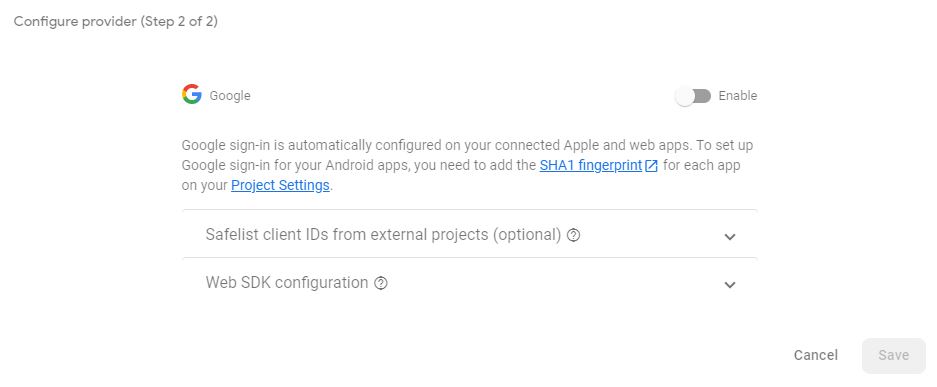
Step 4.

Click ‘Add new provider’ button to enable google method for our firebase auth system. Again select ‘Google’ and enable all and give necessary details. Then save it.
Step 5.
It’s time to create our react app.
npx create-react-app my-app
cd my-app
Step 6
In this step, we have to do some configurations on the firebase console. To do that click on the setting wheel icon on the side menu under the ‘project overview’.

Then you will redirect to the page below. Scroll down it little bit and find ‘Your apps’ section.
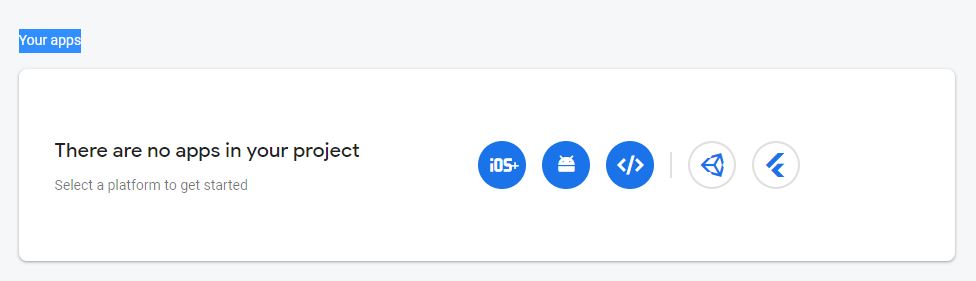
Select the ‘web’ option from the icons. ( 3rd icon ).
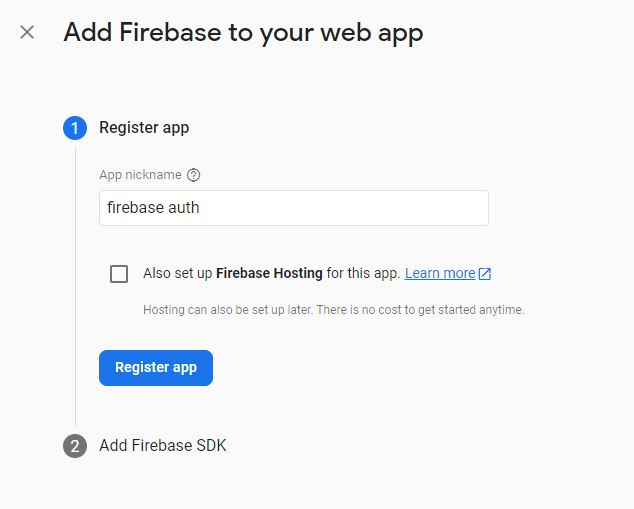
Give a name for the firebase app and then click the ‘register’ button. In here we are not going to use firebase hosting. So you can leave it as it is and then ‘continue to console’.
Step 7
Now we can install firebase in the react project.
npm install firebase
After your successful installation,
Create a folder called ‘firebase_setup’ and create a file called ‘firebase.js’ inside the created folder. Then add below details into that file. Replace with your details. You can find this details form the project settings.
firebase.js
import { initializeApp } from "firebase/app";
import { getFirestore } from "firebase/firestore";

const firebaseConfig = {
  apiKey: "Your-API-Key",
  authDomain: "Your-auth-domain",
  projectId: "your-project-id",
  storageBucket: "your-storage-bucket",
  messagingSenderId: "your-sender-id",
  appId: "your-app-id",
  measurementId: "your–messure-id",
};

const app = initializeApp(firebaseConfig);
const db = getFirestore(app);
export default db;
3. Implementing Authentication in React
3.1 Signup ( firebase auth user registration )
First of all we need to create a component for signup. So create a folder in src called ‘screens’ and then create a file called ‘Signup.js’ inside the above file.
Before we start using firebase auth, we have to import several libraries from firebase auth.
import {
    getAuth,
    createUserWithEmailAndPassword,
    signInWithPopup,
    GoogleAuthProvider,
} from "firebase/auth";
Also add below code snippets into your functional component.
 const auth = getAuth();
 const provider = new GoogleAuthProvider();
Then we need some states to store user information.
 const [email, SetEmail] = useState("");
 const [pwd, setPwd] = useState("");
Now we need to create our signup form.
<form onSubmit={(event) => {sub(event) }}>
    <div>
      <label>
        Email
      </label>
      <input
        type="email"
        placeholder="Email"
        onChange={(e) => {
          SetEmail(e.target.value);
        }}
      />
    </div>
    <div>
      <label>
        Password
      </label>
      <input
        type="password"
        placeholder="Password"
        onChange={(e) => {
          setPwd(e.target.value);
        }}
      />
    </div>
    <div>
      <button
       type="submit"
      >
        Sign In
      </button>
    </div>
</form>
Then,
Lets create an onsubmit function for firebase auth email/password registration.
const sub = (e) => {

	e.preventDefault();
    createUserWithEmailAndPassword(auth, email, pwd)
    .then((userCredential) => {
        const user = userCredential.user;
        console.log(user);
    })
    .catch((error) => {
        const errorCode = error.code;
        const errorMessage = error.message;
        console.log(errorCode,errorMessage);
    });

};
Then if you need add google signup into your form,
First, create a button.
<button onClick={googlesignin}>
    Google
</button>
Now create firebase auth google signup function.
const googlesignin = () => {

  signInWithPopup(auth, provider)
  .then((result) => {
    const credential = GoogleAuthProvider.credentialFromResult(result);
    const token = credential.accessToken;
    const user = result.user;
  })
  .catch((error) => {
    const errorCode = error.code;
    const errorMessage = error.message;
    const email = error.customData.email;
    const credential = GoogleAuthProvider.credentialFromError(error);
    console.log(errorCode, errorMessage, email, credential);
  });

};
Full Signup.js
import React, { useState } from "react";
import {
    getAuth,
    createUserWithEmailAndPassword,
    signInWithPopup,
    GoogleAuthProvider,
} from "firebase/auth";

export default function Signup() {

    const [email, SetEmail] = useState("");
    const [pwd, setPwd] = useState("");

    const auth = getAuth();
    const provider = new GoogleAuthProvider();

    const sub = async (e) => {
        e.preventDefault();
        createUserWithEmailAndPassword(auth, email, pwd)
        .then((userCredential) => {
            const user = userCredential.user;
            console.log(user);
        })
        .catch((error) => {
            const errorCode = error.code;
            const errorMessage = error.message;
            console.log(errorCode,errorMessage);
        });
    };

    const googlesignin = () => {
        signInWithPopup(auth, provider)
          .then((result) => {
            const credential = GoogleAuthProvider.credentialFromResult(result);
            const token = credential.accessToken;
            const user = result.user;
            console.log(user);
          })
          .catch((error) => {
            const errorCode = error.code;
            const errorMessage = error.message;
            const email = error.customData.email;
            const credential = GoogleAuthProvider.credentialFromError(error);
            console.log(errorCode, errorMessage, email, credential);
          });
      };
    return (
        <div>
            <form
            onSubmit={(event) => {
                sub(event);
            }}
            >
                <div>
                    <label>Email</label>
                    <input
                        type="email"
                        placeholder="Email"
                        onChange={(e) => {
                            SetEmail(e.target.value);
                        }}
                    />
                </div>
                <div>
                    <label >Password</label>
                    <input
                        type="password"
                        placeholder="Password"
                        onChange={(e) => {
                            setPwd(e.target.value);
                        }}
                    />
                </div>
                <div>
                    <button type="submit">
                        Sign In
                    </button>
                </div>
                <div>
                    <button onClick={googlesignin} >
                        Google
                    </button>
                </div>
            </form>
        </div>
    );
}
3.1 SignIn ( firebase auth user login )
Create a new file called ‘Signin.js’ inside the above file.
Before we start using firebase auth, we have to import several libraries from firebase auth.
import {
    getAuth,
    createUserWithEmailAndPassword,
    signInWithPopup,
    GoogleAuthProvider,
} from "firebase/auth";
Also add below code snippets into your functional component.
 const auth = getAuth();
 const provider = new GoogleAuthProvider();
Then we need some states to store user information.
 const [email, SetEmail] = useState("");
 const [pwd, setPwd] = useState("");
Now we need to create our signup form.
<form
    onSubmit={(event) => {
    sub(event);
    }}
>
    <div>
      <label>
        Email
      </label>
      <input
        type="email"
        placeholder="Email"
        onChange={(e) => {
          SetEmail(e.target.value);
        }}
      />
    </div>
    <div>
      <label>
        Password
      </label>
      <input
        type="password"
        placeholder="Password"
        onChange={(e) => {
          setPwd(e.target.value);
        }}
      />
    </div>
    <div>
      <button
       type="submit"
      >
        Sign In
      </button>
    </div>
</form>
Then,
Lets create an onsubmit function for firebase auth email/password login.
const sub = (e) => {
    e.preventDefault();
    signInWithEmailAndPassword(auth, email, pwd)
      .then((userCredential) => {
        const user = userCredential.user;
        console.log(user);
         })
      .catch((error) => {
        const errorCode = error.code;
        const errorMessage = error.message;
        console.log(errorCode, errorMessage);
    });
};
Then if you need add google signin into your form,First, create a button.
<button onClick={googlesignin}>
    Google Sign In
</button>
Now create firebase auth google signup function.
const googlesignin = () => {
    signInWithPopup(auth, provider)
      .then((result) => {
        const credential = GoogleAuthProvider.credentialFromResult(result);
        const token = credential.accessToken;
        const user = result.user;
      })
      .catch((error) => {
        const errorCode = error.code;
        const errorMessage = error.message;
        const email = error.customData.email;
        const credential = GoogleAuthProvider.credentialFromError(error);
        console.log(errorCode, errorMessage, email, credential);
    });
};
Full Signin.js
import React, { useState, useEffect } from "react";
import {
  getAuth,
  signInWithEmailAndPassword,
  signInWithPopup,
  GoogleAuthProvider,
} from "firebase/auth";
import { useNavigate, Link } from "react-router-dom";

export default function Signin() {

  const navigate = useNavigate();
  const [email, SetEmail] = useState("");
  const [pwd, setPwd] = useState("");

  const auth = getAuth();
  const provider = new GoogleAuthProvider();

  const sub = (e) => {
    e.preventDefault();
    signInWithEmailAndPassword(auth, email, pwd)
      .then((userCredential) => {
        const user = userCredential.user;
        console.log(user);
        navigate('/dshboard');
      })
      .catch((error) => {
        const errorCode = error.code;
        const errorMessage = error.message;
        console.log(errorCode, errorMessage);
      });
  };


  const googlesignin = () => {
    signInWithPopup(auth, provider)
      .then((result) => {
        const credential = GoogleAuthProvider.credentialFromResult(result);
        const token = credential.accessToken;
        const user = result.user;
        navigate('/dshboard');
      })
      .catch((error) => {
        const errorCode = error.code;
        const errorMessage = error.message;
        const email = error.customData.email;
        const credential = GoogleAuthProvider.credentialFromError(error);
        console.log(errorCode, errorMessage, email, credential);
      });
  };

  return (
    <div>
      <form
        onSubmit={(event) => {
          sub(event);
        }}
      >
        <div>
          <label>
            Email
          </label>
          <input
            type="email"
            placeholder="Email"
            onChange={(e) => {
              SetEmail(e.target.value);
            }}
          />
        </div>
        <div>
          <label >
            Password
          </label>
          <input
            type="password"
            placeholder="Password"
            onChange={(e) => {
              setPwd(e.target.value);
            }}
          />
        </div>
        <div>
          <button>
            Sign In
          </button>
        </div>
        <div>
          <button
            onClick={googlesignin}
          >
            Google
          </button>
        </div>
      </form>
    </div>
  );
}
4. Conclusion
Firebase Auth (authentication) is a powerful tool for adding secure user authentication to your app. It offers a wide range of authentication methods and integrates seamlessly with other Firebase services, making it easy to implement and maintain. By following the steps outlined in this guide, you can quickly set up Firebase Auth in your React app and provide a secure and personalized experience for your users. Remember to always keep your users data and information secure, and to continue learning about Firebase Auth and other Firebase services to enhance your app’s functionality.