
In this article we are going to talk about how to create a birthday poem generator with an awesome AI tool called chatGPT (api integration) and nextJs. It’s totally 100% genuine and poems are generated based on the user’s input such as Gender, Age and Hobbies.
Demo :- https://poems.udarax.me/
Table of content
- Explanation of what the article will cover
- Brief overview of using ChatGPT for generating personalized birthday poems
- Explanation of what ChatGPT is and how it works
- Discussion of ChatGPT's capabilities as a language model
- Instructions for installing necessary software and packages
- Explanation of how to access the ChatGPT API
- Step-by-step instructions for creating the generator
- Explanation of how to customize the generator to personalize the poem
- Discussion of potential challenges and how to troubleshoot them
- Examples of generated poems
- Discussion of how to use the generator in various contexts (e.g. as a gift, in a card, etc.)
- Summary of the article
- Discussion of potential future developments and improvements to the generator.
1. Introduction
What is ChatGPT ?
ChatGPT is a large-scale language model developed by OpenAI. It is based on the GPT (Generative Pre-trained Transformer) architecture, which uses deep learning techniques to generate human-like text. The model is pre-trained on a massive amount of text data and can be fine-tuned for various natural language processing tasks such as language translation, question answering, and text generation. ChatGPT is particularly good at understanding and generating human-like text, making it an ideal tool for creating personalized birthday poems or for other natural language generation tasks.
This article provides a step-by-step guide on how to use the power of OpenAI’s large-scale language model, ChatGPT, to create a personalized birthday poem generator with nextJs. This article begins by introducing the concept of using ChatGPT for generating personalized birthday poems and then goes on to provide an overview of ChatGPT’s capabilities as a language model. Then provides instructions on how to set up the necessary environment and guides the reader through the process of building the generator. This is an ideal resource for anyone interested in learning more about ChatGPT and how it can be used to generate personalized birthday poems.
2. Understanding ChatGPT and its capabilities
ChatGPT itself was not trained from the ground up. Instead, it is a fine-tuned version of GPT-3.5, which itself is a fine-tuned version of GPT-3. The GPT-3 model was trained with a massive amount of data collected from the internet. Think of Wikipedia, Twitter, and Reddit-it was fed data and human text scraped from all corners of the internet.If you’re wondering how GPT training works, GPT-3 was trained using a combination of supervised learning and Reinforcement Learning through Human Feedback (RLHF). Supervised learning is the stage where the model is trained on a large dataset of text scraped from the internet. The reinforcement learning stage is where it is trained to produce better responses that align with what humans would accept as being both human-like and correct.
Capabilities
- Remembers what user said earlier in the conversation
- Allows user to provide follow-up corrections
- Trained to decline inappropriate requests
Limitations
- May occasionally generate incorrect information
- May occasionally produce harmful instructions or biased content
- Limited knowledge of world and events after 2021
3. Setting up the environment
Get an API key from OpenAI ?
First of all, we need to have an OpenAI’s API key to access their services. Simply go to this site https://openai.com/api/ and sign in to OpenAI and then it will automatically redirect to https://beta.openai.com/. Then click on your profile picture ( top right corner ) and select ‘View API Keys’ from the popup menu.
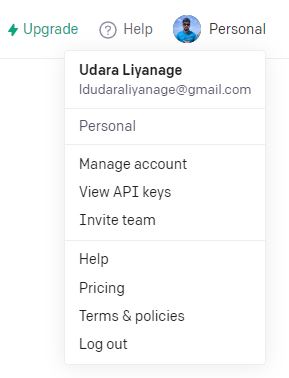
Now we need to create an API key. To do that click on the ‘Create new Secret key’ button and then copy your api key. We will use it later.
Integrate chatGPT into your project.
There are several ways to integrate chatGPT to your projects. But in this article we are going to use chatGPT nextJs library which is developed by OpenAI and I made some modifications on it. You can clone/download it from here. We use this as our foundation to build our birthday poem generator app.
Step 1 :- Clone repo
git clone https://github.com/udaraliyanage96cs/openai-udarax-chatgpt-starter-nextjs.git
Step 2 :- Create a .env file to add your API key. (in root folder)
OPENAI_API_KEY=<YOUR_API_KEY>Step 3 :- Then you need to run below command to install required dependencies.
npm install
4. Building the Birthday Poem Generator
It’s time to edit our index.js file. Within your ‘page’ folder you can see a file called index.js.
This is our main page. We can create our input from here. First of all remove all things inside the page and make it empty.
Step 1 :- import all required things.
import Head from "next/head";
import { useState } from "react";
import styles from "./index.module.css";
Step 2 :- Create states to store input data and response data.
const [gender, setGender] = useState("girl");
const [age, setAge] = useState(18);
const [hobbies, setHobbies] = useState("");
const [loading, setLoading] = useState(false);
const [result, setResult] = useState("");
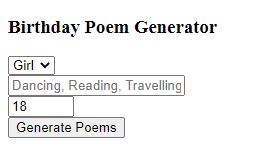
Step 3 :- Create Input form
See below sample input form.
<div>
  <Head>
    <title>OpenAI - UDARAX</title>
  </Head>
  <main className={styles.main}>
    <h3>Birthday Poem Generator</h3>
    <form onSubmit={onSubmit}>
      <div>
        <select
          name="gender"
          value={gender}
          onChange={(e) => setGender(e.target.value)}
          className="form-control mt-2"
          required
        >
          <option value="boy">Boy</option>
          <option value="girl">Girl</option>
        </select>
      </div>
      <div>
        <input
          type="text"
          name="hobbies"
          placeholder="Dancing, Reading, Travelling"
          value={hobbies}
          className="form-control mt-2"
          required
          onChange={(e) => setHobbies(e.target.value)}
        />
      </div>
      <div>
        <input
          type="number"
          min={1}
          max={99}
          name="age"
          placeholder="Enter the age"
          value={age}
          required
          onChange={(e) => setAge(Number.parseInt(e.target.value))}
          className="form-control mt-2"
        />
      </div>
      <input type="submit" value="Generate Poems" />
    </form>
 {loading && <p>Loading ...</p>}
    <div
      className={`d-flex justify-content-center`}
      dangerouslySetInnerHTML={{ __html: result }}
    />
  </main>
</div>
Step 4:- Create onSubmit function.
This function is used to submit our input values to the API and get the response. We have not created API routes. We will create it in the next step.
async function onSubmit(event) {
    event.preventDefault();
    if (loading) {
      return;
    }
    setLoading(true);
    setResult("");
    const response = await fetch("/api/wishapi", {
      method: "POST",
      headers: {
        "Content-Type": "application/json",
      },
      body: JSON.stringify({ gender: gender, age: age, hobbies: hobbies }),
    });
    const data = await response.json();
    setResult(data.result.replaceAll("\n", "<br />"));
    setLoading(false);
}
Here is full index.js
import Head from "next/head";
import { useState } from "react";
import styles from "./index.module.css";


export default function Home() {
  const [gender, setGender] = useState("girl");
  const [age, setAge] = useState(18);
  const [hobbies, setHobbies] = useState("");
  const [loading, setLoading] = useState(false);
  const [result, setResult] = useState("");


  async function onSubmit(event) {
    event.preventDefault();
    if (loading) {
      return;
    }
    setLoading(true);
    setResult("");
    const response = await fetch("/api/generate", {
      method: "POST",
      headers: {
        "Content-Type": "application/json",
      },
      body: JSON.stringify({ gender: gender, age: age, hobbies: hobbies }),
    });
    const data = await response.json();
    setResult(data.result.replaceAll("\n", "<br />"));
    setLoading(false);
  }


  return (
    <div>
      <Head>
        <title>OpenAI - Udarax</title>
      </Head>


      <main className={styles.main}>
        <h3>Birthday Poem Generator</h3>
        <form onSubmit={onSubmit}>
          <div>
            <select
              name="gender"
              value={gender}
              onChange={(e) => setGender(e.target.value)}
              className="form-control mt-2"
              required
            >
              <option value="boy">Boy</option>
              <option value="girl">Girl</option>
            </select>
          </div>
          <div>
            <input
              type="text"
              name="hobbies"
              placeholder="Dancing, Reading, Travelling"
              value={hobbies}
              className="form-control mt-2"
              required
              onChange={(e) => setHobbies(e.target.value)}
            />
          </div>
          <div>
            <input
              type="number"
              min={1}
              max={99}
              name="age"
              placeholder="Enter the age"
              value={age}
              required
              onChange={(e) => setAge(Number.parseInt(e.target.value))}
              className="form-control mt-2"
            />
          </div>
          <input type="submit" value="Generate Poems" />
        </form>
        <div
          className={`d-flex justify-content-center`}
          dangerouslySetInnerHTML={{ __html: result }}
        />
      </main>
    </div>
  );
}
If you need good looks, you can change the styles using css. I’m not going to do that here. If you need help with that, let me know.
Step 5:- Now we need to create a new folder called ‘API’ inside the ‘pages’ folder. And then create a new file called ‘wishapi.js’.
To create endpoints first we need to import required libraries from ‘openai’.
import { Configuration, OpenAIApi } from "openai";
Then, need to configure the API key into the api endpoints.
const configuration = new Configuration({
  apiKey: process.env.OPENAI_API_KEY,
});
const openai = new OpenAIApi(configuration);
Step 6:- Create a function to make API query
Before integrating the query just try to execute and need check whether we can get the expected result or not.
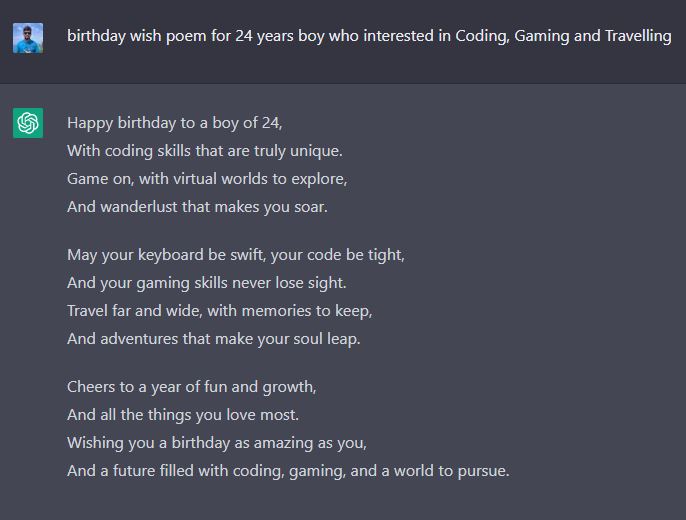
This is the result that we expected. Now we can create a function to generate a prompt.
function generatePrompt( gender, age, hobbies) {
  return `birthday wish poem for ${age} years ${gender} who interested in ${hobbies}`;
}
Create a default function to make API requests. Inside this function, you need to get the data from our input form first.
const { gender, age, hobbies } = req.body;
Then make the API request to OpenAI and get the response form it like below.
const completion = await openai.createCompletion({
    model: "text-davinci-003",
    prompt: generatePrompt( gender, age, hobbies),
    temperature: 0.6,
    max_tokens:2048,
});
res.status(200).json({ result: completion.data.choices[0].text });
Here is full wishapi.js
import { Configuration, OpenAIApi } from "openai";

const configuration = new Configuration({
  apiKey: process.env.OPENAI_API_KEY,
});
const openai = new OpenAIApi(configuration);

export default async function (req, res) {
  const {  gender, age, hobbies } = req.body;
  const completion = await openai.createCompletion({
    model: "text-davinci-003",
    prompt: generatePrompt( gender, age, hobbies),
    temperature: 0.6,
    max_tokens:2048,
  });
  res.status(200).json({ result: completion.data.choices[0].text });
}

function generatePrompt( gender, age, hobbies) {
  return `birthday wish poem for ${age} years ${gender} who interested in ${hobbies}`;
}
5. Testing and Using the Generator
To run the project,
npm run dev
Then open your browser and route below url.
http://localhost:3000/
Then you can test your app. As an example I give below inputs to the app lets see the result.
Age :- 24
Gender :- Boy
Hobbies :- Coding, Gaming and Travelling
Gender :- Boy
Hobbies :- Coding, Gaming and Travelling
‘’Happy birthday to you, you are now 24
Your life has been filled with fun and glee
Coding, gaming, and traveling too
You have lots of things to explore, it’s true
Your journey has just begun, and it’s so grand
You’ll see the world, and make a stand
A future so bright, and with lots of joy
Your life will be full of adventure and ploy
So have a great birthday, and have a blast
Achieving your dreams is the goal to last
Happy 24th birthday, you’re on your way
To a life of success, day after day.’’
Here is the git repo for this full project :- https://github.com/udaraliyanage96cs/birthday-wish-demo
OUTPUT

Full Video Tutorial
6. Conclusion
“Generating Personalized Birthday Poems with ChatGPT” is an informative guide on how to use OpenAI’s large-scale language model, ChatGPT, to create a personalized birthday poem generator. The article provides a detailed explanation of ChatGPT and its capabilities, as well as step-by-step instructions on how to set up the necessary environment and build the generator. The article concludes with examples of generated poems and suggestions for using the generator in various contexts.
Overall, this article is a valuable resource for anyone interested in learning more about ChatGPT and how it can be used to generate personalized birthday poems. The generator created using ChatGPT can help to create unique and personalized birthday poems for loved ones, making it a great way to show your affection and appreciation. The use of ChatGPT technology in this way demonstrates its versatility and potential to be used in different applications.