
In this article I’m going to show you how to get your own google maps api key for free for 1 year. Follow all the steps from start to end.
Table of content
- Briefly introduce the importance and benefits of using Google Maps API.
- Explain how obtaining an API key is essential for accessing and utilizing Google Maps services.
- Create a Google Cloud Platform (GCP) Account
- Create a New Project
- Enable the Google Maps API
- Generate an API Key
- Recap the key points discussed in the blog post
- Encourage readers to take action and start unlocking the power of Google Maps with their newly acquired API key
1.Introduction
The google maps API key is a unique identifier that authenticates requests associated with your project for usage and billing purposes. You must have at least one API key associated with your project.The API key is used to track usage of the APIs and to ensure that the terms of service are being followed. In simple terms the google maps API is a set of package pieces of code that let you quickly and easily include maps on your websites or in your mobile apps. There are so many awesome library services included.
2. Step-by-Step Guide to Obtaining a Google Maps API Key
Before get a google maps api key you need to have a google cloud platform account. Simply you can create an account using your gmail account
2.1 Create Google cloud platform account
Click here to create a google cloud platform account (https://cloud.google.com/) or if you already have an account login into it.
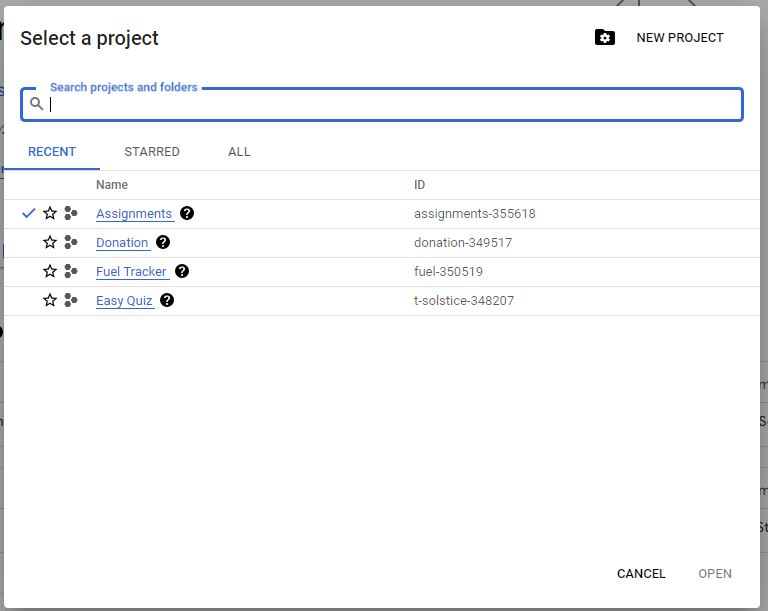
2.2 Create a Project
Now you are in the google cloud console portal. Here is the place to create a new project for our google maps api custom marker tutorial. To do that you just click on the dropdown which is located in the top bar. Then you will see a popup box. From that, select ‘New Project’ to create a new project. ( see attached figure below )
Then you will navigate to the next window. In that you can give a name for your project and click the create button. Keep the other settings as it is.
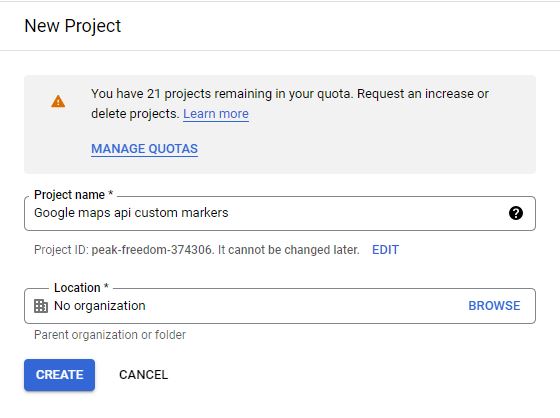
It will take several seconds to create a new project. After completing the process you will be notified by a notification. Then select the project you created from the dropdown.
2.3 Enable the Google Maps API
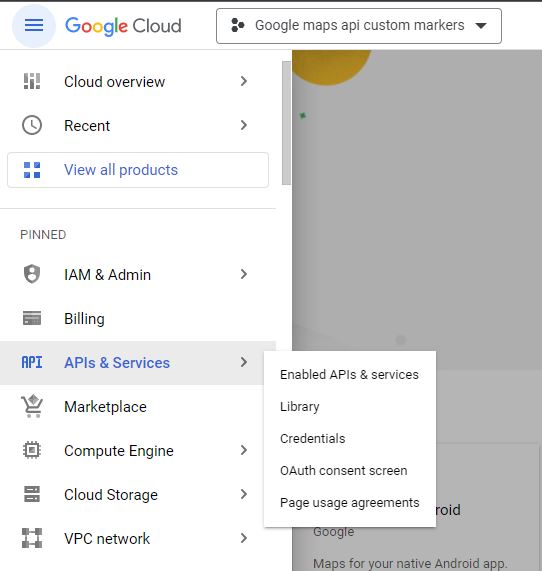
Once you have a Google Cloud Platform account and a project set up, the next step is to enable the Google Maps API for your project. To do that, click on the 3 bars ( hamburger menu) which is located in the top left corner and then select ‘APIs & Services’. Then, select the ‘Library’ from the child menu.
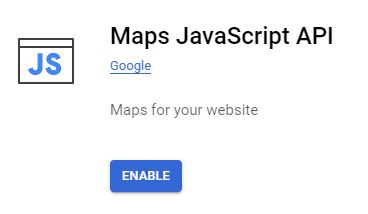
Now we can enable required APIs for our google maps api custom markers project. In this case im going to add maps java-script sdk. To do that search ‘Maps JavaScript API’ in the search and select. Then it will redirect to the product details page. You can enable the ‘maps javascript api’ from here.
It will take several seconds to complete. Then you need to add a billing account to these services. It’s totally free. But without setting up the billing account you will not be able to use google maps api in your projects. Keep it in mind.
2.4 Generate an API Key
It’s time to get your api key. To do this, again click on the 3 bars ( hamburger menu) which is located in the top left corner and then select ‘APIs & Services’. But this time, select the ‘Credentials’ from the child menu.
Then it will automatically redirect to the Credentials page. From this page click on the ‘Create Credentials’ button and then select ‘API’ Key.

If you need a video tutorial for the above steps. Please follow the video below.
5. Conclusion
In conclusion, obtaining a Google Maps API key is a crucial step towards unlocking the full potential of Google Maps services for your website or application. Throughout this guide, we have explored the process of obtaining an API key, from creating a Google Cloud Platform account to enabling the necessary APIs and implementing the key into your project.
By acquiring an API key, you gain access to a wide range of features and capabilities offered by Google Maps API, empowering you to enhance user experiences, provide accurate location information, and integrate powerful mapping functionalities into your digital projects.
As you venture into the world of Google Maps API, remember to adhere to best practices for managing and securing your API key. Protecting your key and configuring appropriate usage restrictions will help safeguard your data and prevent unauthorized access.
Now armed with the knowledge and steps outlined in this guide, you are ready to embark on your journey with Google Maps API. Start incorporating interactive maps, geolocation services, and other exciting features to enrich your website or application. The possibilities are endless, and the power of Google Maps is at your fingertips.
So, don’t wait any longer! Follow the steps provided, obtain your Google Maps API key, and unlock the true potential of location-based services. Happy mapping!