Hello everyone, today we are going to learn How to PHP Email Send. Are you new to PHP and wondering PHP send email from your application? Look no further! In this beginner’s guide, we will walk you through the process of PHP email send, step by step. From setting up the necessary dependencies to crafting the perfect email message, we’ve got you covered. By the end of this article, you’ll have a solid understanding of how to use PHP to send emails with ease. So let’s get started and make PHP email send made easy!
Table of content
- Why PHP Email Send Essential?
- Overview of PHP email functions and libraries
- Installing PHP and an email server
- Configuration options for sending emails
- The mail() function
- Example code for sending a simple email
- Using additional libraries and functions
- Adding attachments, HTML formatting, and other features
- Common issues when sending emails with PHP
- Tips for improving deliverability and avoiding spam filters
- Recap of key points PHP Email Send
I. Introduction - PHP Email Send
Why PHP Email Send Essential?
Sending emails with PHP is a powerful and easy way to communicate with your users or customers. It can be used for a variety of purposes, such as sending newsletters, marketing campaigns, automated notifications, and more. PHP provides a number of built-in functions and libraries that make it easy to send emails directly from your website or application.
In this article, I’m going to cover the basics of sending emails with PHP and provide some tips for improving deliverability and adding advanced features. Whether you are a beginner looking to get started with PHP email or an experienced developer looking to fine-tune your skills, this post will provide valuable insights and resources.
Overview of PHP email send functions and libraries
PHP offers several functions and libraries that can be used to send emails. The most basic and widely used function is the mail() function, which is included with PHP by default. This function allows you to send simple emails with plain text or HTML content, and supports a number of optional parameters for adding attachments, specifying the sender and recipient, and more.
Also this built-in mail function has pros and cons. I put all the details regarding that below.In addition to the mail() function, there are also a number of third-party libraries and frameworks that provide additional features and functionality for sending emails with PHP. Some popular options include PHPMailer, Swift Mailer, and Zend_Mail. These libraries also can be used to send emails with more advanced formatting, encryption, and other features, as well as to integrate with external email services like Gmail or Amazon SES.
In this article, I will cover both the mail() function and a most popular email library for PHP, and provide examples of how to use it to send emails from your website or application.
II. Setting up your PHP email environment
Before you can start sending emails with PHP, you have to set up a few things on your server or development environment. Here are the steps you need to follow.
Install XAMPP ( if you are not already installed in your local pc )
XAMPP is a free, open-source development environment that includes PHP, an email server, and other tools needed to run a local web server ( for example :- apache and mysql ) . To install XAMPP, visit the XAMPP website (https://www.apachefriends.org/index.html) and follow the instructions for your operating system.
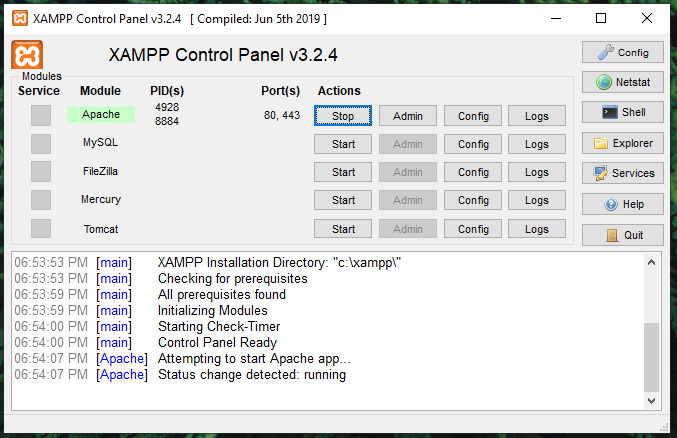
Start the XAMPP control panel and start the Apache server Once XAMPP is installed, This server will allow you to run PHP scripts from your local machine.
If you have installed the xampp on your pc successfully and started the apache and mysql server as an example you should have this kind of panel.
Configure PHP to send emails
Step 1: we need to enable php_openssl php extensions from the php.ini file. For XAMPP, it is located in C:\XAMPP\php\php.ini.You can download from php_openssl.dll.
Step 2: Find the mail function in the php.ini file. You can find the code below.
[mail function]
; XAMPP: Comment out this if you want to work with an SMTP Server like Mercury
; SMTP = localhost
; smtp_port = 25
; For Win32 only.
; http://php.net/sendmail-from
;sendmail_from = postmaster@localhost
;sendmail_path = "\"D:\xampp\sendmail\sendmail.exe\" -t"
replace with you SMTP configuration parameters like below,
[mail function]
; XAMPP: Comment out this if you want to work with an SMTP Server like Mercury
SMTP = smtp.gmail.com
smtp_port = 25
; For Win32 only.
; http://php.net/sendmail-from
sendmail_from = yourgmail@gmail.com
sendmail_path = "\"D:\xampp\sendmail\sendmail.exe\" -t"
Step 3: Open sendmail.ini which is located on “c:\xampp\sendmail\sendmail.ini” and change SMTP configuration parameters.
[mail function]
smtp_server=smtp.gmail.com
smtp_port=25
auth_username=phpflow@gmail.com
auth_password=XXXXXXX
force_sender=phpflow@gmail.com
Step 4: Restart your Apache server.
Test your email configuration
To test your email configuration, create a new PHP file in the “htdocs” folder within the XAMPP installation directory, and add the following code:
<?php
    $to = "recipient@example.com";
    $subject = "Test Email";
    $message = "This is a test email sent from PHP.";
    $headers = "From: sender@example.com";
    mail($to, $subject, $message, $headers);
?>
Replace “recipient@example.com” and “sender@example.com” with your own email address. Then create a folder inside the “htdocs” (C:\xampp\htdocs) folder and rename it as “phpmail” and after that save the script as “example_test.php” Then, open your web browser and navigate to “http://localhost/phpmail/example_test.php” to run the script. If everything is set up correctly, you should see the message “Email sent!” and receive an email at the specified address.
Once you have your PHP and email server set up and configured correctly using XAMPP, you should be ready to start sending emails with PHP. In the next section, I’m going to cover the basics of how to use the mail() function to send simple emails.
III. Basic PHP email sending
The most basic and widely used function for sending emails with PHP is the mail() function, which is included with PHP by default.
The mail() function has the following syntax:
mail(to, subject, message, headers, parameters);“to” is the email address of the recipient.
“subject” is the subject of the email.
“message” is the body of the email. This can be plain text or HTML.
“headers” is an optional parameter that allows you to specify additional information about the email, such as the sender’s address, the “CC” and “BCC” recipients, and the “Content-Type” (for sending HTML emails).
“parameters” is an optional parameter that allows you to specify additional options for the mail server, such as the path to the “sendmail” program or the connection string for an SMTP server.
Here is an example of how to use the mail() function to send a simple email with plain text content:
<?php
    $to = "testuser@example.com";
    $subject = "udarax.me";
    $message = "This is a test email sent from udarax.me.";
    $headers = "From: testadmin@example.com\r\n";
    mail($to, $subject, $message, $headers);
    echo "Email sent!";
?>
To send an HTML email, you will need to specify the “Content-Type” header and include the HTML content in the message:
<?php
    $to = "testuser@example.com";
    $subject = "udarax.me";
    $message = "<html><body><p>This is a test email sent from <b>udarax.me</b>.</p></body></html>";
    $headers = "From: testadmin@example.com\r\nContent-Type: text/html\r\n";
    mail($to, $subject, $message, $headers);
    echo "Email sent!";
?>
Pros and Cons
Pros:
- It is simple to use and requires minimal setup.
- It can be used to send emails from a web server without the need for additional software or libraries.
Cons:
- The mail function does not support all features that are available in more advanced email libraries, such as sending emails with attachments or to specify custom headers.
- It is not as reliable as other email delivery methods, as it relies on the server’s mail transfer agent (MTA) to deliver the email. This can result in emails being marked as spam or being rejected by the recipient’s server.
- It does not provide any feedback on the success or failure of the email delivery, so it can be difficult to determine if an email was actually delivered.
That’s all about the mail() function, you can easily send emails with PHP using simple or advanced formatting. In the next section, we will cover some additional libraries and functions that you can use to add even more features and functionality to your PHP emails.
IV. Advanced PHP email send methods ( PHPMailer )
While the mail() function is a useful tool for sending simple emails with PHP, it may not always be sufficient for more advanced requirements. In such cases, you may want to consider using a third-party email library, such as PHPMailer.
PHPMailer is a code library to send (transport) emails safely and easily via PHP code from a web server (MUA to the MSA server).
To use PHPMailer, you will need to install the library on your server or development environment. You can do this using composer by running the following command:
composer require phpmailer/phpmailer
Also you can manually download the latest release of PHPMailer from the project’s GitHub page (https://github.com/PHPMailer/PHPMailer).
Once you have PHPMailer installed, you can use it to send emails by creating a new instance of the “PHPMailer” class and setting the desired properties and options. To send an HTML email with PHPMailer, you can set the “isHTML” option to “true” and include the HTML content in the “Body” property:
<?php
use PHPMailer\PHPMailer\PHPMailer;
use PHPMailer\PHPMailer\SMTP;
use PHPMailer\PHPMailer\Exception;

require 'vendor/autoload.php';

//Create an instance; passing `true` enables exceptions
$mail = new PHPMailer(true);

try {
    //Server settings
    $mail->SMTPDebug = SMTP::DEBUG_SERVER;                      //Enable verbose debug output
    $mail->isSMTP();        //Send using SMTP
    $mail->Host       = 'smtp.example.com'; //Set the SMTP server to send through
    $mail->SMTPAuth   = true;    //Enable SMTP authentication
    $mail->Username   = 'user@example.com';   //SMTP username
    $mail->Password   = 'secret'; /SMTP password
    $mail->SMTPSecure = PHPMailer::ENCRYPTION_SMTPS;//Enable implicit TLS encryption
    $mail->Port = 465; //TCP port to connect to; use 587 if you have set `SMTPSecure = PHPMailer::ENCRYPTION_STARTTLS`

    //Recipients
    $mail->setFrom('from@example.com', 'Mailer');
    $mail->addAddress('joe@example.net', 'Joe User');     //Add a recipient
    $mail->addAddress('ellen@example.com');               //Name is optional
    $mail->addReplyTo('info@example.com', 'Information');
    $mail->addCC('cc@example.com');
    $mail->addBCC('bcc@example.com');

    //Attachments
    $mail->addAttachment('/var/tmp/file.tar.gz');         //Add attachments
    $mail->addAttachment('/tmp/image.jpg', 'new.jpg');    //Optional name

    //Content
    $mail->isHTML(true);                                  //Set email format to HTML
    $mail->Subject = 'Here is the subject';
    $mail->Body    = 'This is the HTML message body <b>in bold!</b>';
    $mail->AltBody = 'This is the body in plain text for non-HTML mail clients';

    $mail->send();
    echo 'Message has been sent';
} catch (Exception $e) {
    echo "Message could not be sent. Mailer Error: {$mail->ErrorInfo}";
}


?>
You can find more information and examples in the PHPMailer documentation (https://github.com/PHPMailer/PHPMailer).
V. Troubleshooting and best practices
Sending emails with PHP is a straightforward process, but there are few common problems. Here are some tips to troubleshoot and improve the reliability and deliverability of your PHP emails.
Check your server’s error logs: If you are experiencing issues when trying to send emails with PHP, the first thing you should do is check your server’s error logs. These logs may contain useful information about why the email is not being sent, such as connection errors, authentication failures, or other issues.
Verify that your email server is configured correctly: Make sure that your email server is correctly configured and that it is not being blocked by any firewall or security settings.
Test your email setup: You can use the test script provided in the previous section to verify that your PHP and email server are set up correctly and that you are able to send emails from your server.
Use a third-party email library or service: If you are having trouble sending emails with the mail() function or are looking for more advanced features, you may want to consider using a third-party email library or service, such as PHPMailer or Amazon SES (add links). These libraries and services can provide additional functionality and improve the deliverability of your emails.
VI. Conclusion
In this article, I have covered the basics of sending emails with PHP using the mail() function and the PHPMailer library. We have also discussed some common issues and best practices for improving the reliability and deliverability of your PHP emails.
I hope this tutorial is helpful and now you feel confident in your ability to send emails with PHP. If you have anything, feel free to send a message to me. Happy coding!